Docket Calendar

Conquer Your Calendar.

dc-logo
+ New Case
+ New Events
From Rules Custom Event

Dashboard

Cases

Calendar

Create Report

Events

Archive

TOOLS
Research Console
Excluded Events
SETTINGS
Profile
HELP
User Guide
Get Help
Privacy Policy
What's New


00:00
Log Out

Copyright © 2026 DocketCalendar

Get Help

Open a Support Ticket
or
Support & Training

User Guide

    • Overview
    • What is DocketCalendar
    • Core concepts
    • Connect your calendar
    • Overview
    • Create a new case
    • Add events from rules
    • Add a custom event
    • View your dashboard
    • Use the calendar view
    • Overview
    • Edit a case
    • Edit an event
    • Edit a trigger
    • Recalculate trigger dates
    • Archive a case, trigger, or event
    • Overview
    • Run a report
    • Save and reuse reports
    • Export your results
    • Overview
    • Invite a team member
    • Edit a team member
    • Roles and case access
    • Update your profile
    • Manage your subscription
    • Overview
    • Set your default jurisdiction
    • Configure event reminders
    • Customize how events appear on your calendar
    • All settings reference
    • Overview
    • Check sync status
    • View activity log
    • Research court rules
    • Manage excluded events

Welcome

Overview

DocketCalendar helps law firms calculate, track, and manage court deadlines without the manual math. This chapter introduces what the app does, the three concepts you'll use most often, and how to connect an external calendar if you want your deadlines to appear in Outlook or Google.

If you're brand new, read straight through. If you're already familiar with the basics, the Core concepts section is a useful refresher before diving into the rest of the guide.

What is DocketCalendar

Dashboard with a case loaded and several events visible — hero shot that shows the app at a glance

DocketCalendar is a deadline calculation and case management tool built for law firms. You enter a case and a triggering event — a complaint filing, a motion served, a notice received — and the app generates every related deadline based on the rules for that jurisdiction.

The deadlines live in DocketCalendar by default. If you want them to also appear on your firm's existing calendar, you can connect Outlook or Google and DocketCalendar will sync events out automatically.

A few things DocketCalendar handles for you:

  • Jurisdiction-specific rule sets. The app maintains the rules for federal courts and every U.S. state, so you don't have to look them up. When you choose a jurisdiction and a trigger, you get the right deadlines.
  • Court holidays and weekends. Calculations roll forward or backward based on the rules of each jurisdiction. You don't need to check a calendar.
  • Recalculation. If a trigger date changes — and they do — recalculating updates every dependent deadline at once.
  • Team coordination. Add team members to a case, assign deadlines, and everyone sees the same information.

There's also an advanced feature called Custom Triggers that lets firms build their own trigger logic for unique workflows. It's currently in beta and rolled out selectively. Contact support if you're interested.

The rest of this guide walks through how to do each of those things. The next section explains the three concepts that make the app work.

Core concepts

DocketCalendar revolves around three concepts: cases, triggers, and events. Understanding how they relate makes everything else in the app easier.

Cases

A case is the container for a single matter. It holds the matter's triggers, events, assignees, and calendar connections. Most firms create one case per litigation matter, though some firms use cases to track non-litigation deadlines as well.

Every case has a name, a jurisdiction, and at least one trigger. Beyond that, you can add notes, assignees, custom fields, and connections to specific calendars.

Triggers

A trigger is the originating action that starts a chain of deadlines. Filing a complaint is a trigger. Serving a motion is a trigger. Receiving a notice of removal is a trigger.

Each trigger has a date and a type. Once you add it to a case, DocketCalendar uses the rules for that jurisdiction to calculate every deadline that flows from it.

If a trigger date changes — say a hearing gets continued — you can recalculate and every dependent deadline updates at once. See Recalculate trigger dates for how that works.

Events

An event is a single deadline or appearance. When you add a trigger, DocketCalendar generates a list of events tied to it — opposition briefs, reply deadlines, hearing dates, and so on.

Events can also exist on their own without a trigger behind them. If you need to track a deadline that isn't tied to a jurisdiction rule — a client meeting, an internal review date, a deadline from a contract — you can add it as a custom event. See Add a custom event for how.

How they fit together

Case
 ├── Trigger (e.g., Complaint Filed on 1/15/2026)
 │    ├── Event: Answer Due
 │    ├── Event: Case Management Conference
 │    ├── Event: Initial Disclosures Due
 │    └── Event: Discovery Cutoff
 └── Trigger (e.g., Motion Served on 3/2/2026)
      ├── Event: Opposition Due
      └── Event: Reply Due

A case can have many triggers. A trigger can have many events. Most of your day-to-day work in DocketCalendar happens at the event level, but cases and triggers are how everything stays organized.

Connect your calendar

webintro / Connect Calendar page showing Outlook and Google options

By default, your DocketCalendar events live inside the app. If you'd like them to also appear on your Outlook or Google calendar, you can connect a calendar so events sync automatically.

This step is optional. If you only need to see your deadlines inside DocketCalendar, you can skip this section.

Before you start

You'll need:

  • An Outlook (Microsoft 365) account or a Google account
  • Permission to grant calendar access for that account

For Outlook accounts on an enterprise tenant, your IT administrator may need to approve the connection the first time. DocketCalendar will guide you through that flow if it applies.

Connecting

  1. Open the sidebar and click Connect Calendar.
  2. Choose Outlook or Google.
  3. Sign in to the account you want to connect.
  4. Approve the permissions DocketCalendar requests. These cover reading and writing calendar events on your behalf — nothing more.
  5. Once the connection completes, you're returned to the app.

From this point forward, any event you create in DocketCalendar will sync to the connected calendar. Editing an event in DocketCalendar updates the connected calendar. Archiving or deleting an event removes it from the connected calendar too.

What gets synced

  • Events you create or edit in DocketCalendar sync out to your connected calendar.
  • Events you create directly in Outlook or Google stay there. DocketCalendar doesn't pull external events back in.
  • Your existing calendar appointments are untouched. DocketCalendar only manages the events it created.

Changing or disconnecting

To switch from Outlook to Google or vice versa, contact support. To stop syncing entirely, contact support and we'll disconnect the account for you.

Looking for something specific? Use the search bar at the top of this guide. For anything not covered here, click Get Help in the sidebar to reach the DocketCalendar team directly.

Creating Events

Overview

Creating events is the core of what you'll do in DocketCalendar. This chapter covers how to set up a case, generate deadlines from jurisdiction rules, add one-off custom events, and view what's coming up — both as a list on your dashboard and as a calendar grid.

Most workflows in DocketCalendar follow the same path: create a case, add a trigger, let the app calculate the events. The articles below walk through that flow plus the two views you'll use to see your work.

Create a new case

Create New Case page with the form filled in

A case is the container for everything related to a single matter — its triggers, events, assignees, and calendar connections. Every event in DocketCalendar belongs to a case, so this is usually your first step.

To create a case

  1. Click New Case in the sidebar.
  2. Enter a case name. This is the only required field. Use the name your firm uses internally — it'll appear on every event for this case.
  3. Set the jurisdiction. The jurisdiction determines which rule set DocketCalendar uses when calculating deadlines. Pick the court where the matter is pending.
  4. Add assignees if you want specific team members tied to the case. Assignees can be filtered later in reports and on the dashboard.
  5. Add calendars if you want events for this case to sync to specific Outlook or Google calendars. Available only if you've connected a calendar.
  6. Add any notes, case number, or other optional details.
  7. Click Save.

If a case with the same name already exists, DocketCalendar will let you know before saving. You can either rename the new case or proceed if the duplicate is intentional.

What happens next

Once the case is saved, you're ready to add events to it. The most common next step is Add events from rules.

Add events from rules

Docket Calculator with the three-section accordion visible

Adding events from rules is how you generate a full set of deadlines for a case in one step. You pick a triggering event, set its date, and DocketCalendar calculates every related deadline using the rules for your jurisdiction.

To add events from rules

  1. Click New Events in the sidebar, then choose From Rules.
  2. Section 1 — Case & Jurisdiction. Choose the case you're adding events to. The jurisdiction defaults to the one set on the case. Click Done to move on.
  3. Section 2 — Trigger Configuration. Pick the trigger — for example, Complaint Filed or Motion Served. Set the trigger date, time, and timezone. Choose a service type if the trigger requires it. Click Done.
  4. Section 3 — Additional Details. Optional. Add a custom title, location, or description that will appear on every event generated. Most users skip this section.
  5. Click Preview. DocketCalendar calculates the deadlines and shows you the full list.

Reviewing and customizing

After Preview, the form collapses and a list of calculated events appears. Each row shows the event name, its calculated date, and the rule it's based on.

From here you can:

  • Select which events to save. Check or uncheck individual events. Use Select All to include everything.
  • Edit individual events inline. Click an event's date or title to adjust it without changing the rule.
  • Add a custom event to the mix. Click + Add Custom Event to include a one-off deadline alongside the calculated ones.
  • See parent-child relationships. Some events depend on other events. Click Show Parent/Child Relationships to see how they're linked.

Assigning and saving

Before saving, use the Assign to All Events panel to set who's attending and where the events should appear:

  • Attendees — the team members who should see the events.
  • Owners — the dashboards the events should appear on.
  • Categories (Outlook only) — color labels for your Outlook calendar.

When everything looks right, click Save Events — or, if you have a calendar connected, Save & Add to Outlook Calendar or Save & Add to Google Calendar. The events save to DocketCalendar and, if applicable, sync out to your connected calendar.

If you need to start over without saving, click Start Over. Nothing is saved until you confirm.

Add a custom event

Custom Event tab of the calculator

Custom events are one-off deadlines that aren't tied to a jurisdiction rule. Use them for things like client meetings, internal review dates, contract deadlines, or anything else you want tracked without invoking the rule engine.

To add a custom event

  1. Click New Events in the sidebar, then choose Custom Event.
  2. Choose the case the event belongs to.
  3. Choose whether to attach the event to an existing trigger, or leave the trigger field empty to create a standalone custom event under the case.
  4. Set the timezone for the events.
  5. Fill in the event details: name, date, time (or check All Day). Optionally add a title, location, or description.
  6. To add another event, click + Add Another Event and repeat.
  7. Once you've added everything you need, set the attendees, owners, and (Outlook only) categories in the assignment panel.
  8. Click Save Events.

Custom events behave like any other event in DocketCalendar — they appear on the dashboard and calendar, sync to connected calendars, and show up in reports.

View your dashboard

Dashboard with KPI cards, filters, and the events list

The dashboard is your home base. It shows your upcoming events as a list, summary numbers at the top, and your recently accessed cases at the bottom.

What you'll see

  • KPI cards at the top: Today's Events, Next 7 Days, and Appearances This Week. These always reflect the current date, regardless of what filters you've set below.
  • Upcoming events list. A chronological list of events based on the filters you've applied.
  • Recent cases. Up to eight cases you've worked on recently, with a link to view all cases.

Filtering

Three filters control what's in the events list:

  • Scope — My Events, My Case Deadlines, or All Events. My Events shows only events where you're an attendee. My Case Deadlines shows events from cases assigned to you. All Events shows everything you have access to.
  • Range — Day, Week, Month, Year, or All. Controls the time window.
  • Event type — All Types, Appearances Only, or Deadlines Only. Appearances are events you need to show up for; deadlines are due dates.

Use the date navigation arrows to move through the selected range, or click Today to snap back.

Opening an event

Click any event in the list to open its full details. From there you can edit, archive, or navigate to the related case or trigger.

Use the calendar view

/docket calendar view in month mode

The calendar view shows your events on a traditional calendar grid. Use it when you want to see how deadlines cluster, scan a week at a glance, or check what's coming up over a longer window than the dashboard shows.

Views

Toggle between view modes using the buttons at the top of the calendar:

  • Month — full month grid.
  • Weekdays — month view with weekends hidden.
  • Week — current week with time slots.
  • Work Week — current week, weekdays only.
  • Day — single day in detail.
  • List — agenda-style list of upcoming events.

Click the month title to jump to a specific month and year.

Filtering

The same filters from the dashboard apply here:

  • Scope controls whose events you see.
  • Event type filters between appearances and deadlines.

Filter changes apply immediately — no need to reload.

Opening an event

Click any event on the calendar to open a quick-view popup. From there you can jump to the full event details, the related trigger, or the parent case.

To make changes to events you've already created, see the Editing chapter.

Editing

Overview

Cases, triggers, and events all change. A hearing gets continued, a party gets added, a deadline gets adjusted. This chapter covers how to edit each one, when to use recalculation instead of editing, and how to archive things you no longer need (and bring them back if you change your mind).

If you have a calendar connected, edits in DocketCalendar sync out automatically. You don't need to update Outlook or Google separately.

Edit a case

Editing Case page

Editing a case lets you change the case's metadata — its name, jurisdiction, assignees, calendars, notes, and other details — without affecting the triggers and events inside it.

To edit a case

  1. From the Cases page, click the case you want to edit. This opens the case's detail view.
  2. Click Edit Case.
  3. Make your changes. Every field from the original case form is editable.
  4. Click Update.

When edits affect existing events

Some changes — like adding or removing assignees, changing calendars, or updating notification settings — can affect the events already in the case. When you click Update, DocketCalendar will ask:

  • Update All Events — apply the changes to every event in the case, past and future.
  • Update Future Events Only — apply the changes only to events that haven't occurred yet.

Choose based on what makes sense for the change. Adding a new assignee mid-case is usually Future Events Only. Fixing a typo in the case name is usually Update All Events.

If you have a calendar connected, the changes sync out to your connected calendar as part of the update.

Edit an event

Editing Event page

Editing an event changes the details of a single deadline or appearance without affecting anything else in the case.

To edit an event

  1. Find the event you want to edit. You can get to it from the Dashboard, the Calendar view, or the case's event list.
  2. Click the event to open its details, then click Edit.
  3. Make your changes. You can update the event's name, date, time, timezone, type, attendees, reminders, and any custom title, location, or description.
  4. Click Update.

Editing a parent event

Some events are linked to others — a deadline that depends on a hearing date, for example. When you edit an event that has dependent (child) events, DocketCalendar will ask whether to:

  • Update only this event — change just this one, leaving its children at their original dates.
  • Update this event and its children — push the change through to every dependent event.

Choose carefully. Updating children recalculates their dates based on the rule that links them to the parent. If you only want to fix a single event's details without affecting the chain, choose only this event.

Edit a trigger

Editing Trigger page

Editing a trigger changes the trigger's metadata — its title, assignees, calendars, reminders, and custom details — without changing the date math behind the events it generated.

Use this when you need to adjust how a trigger is labeled or who's notified, but the underlying dates are still correct. If you need to change the trigger date and regenerate all the events that follow from it, see Recalculate trigger dates instead.

To edit a trigger

  1. From the case detail view, find the trigger you want to edit.
  2. Click Edit Trigger.
  3. Make your changes.
  4. Click Update.

Edits to the trigger propagate to the events generated from it, the same way case-level edits do — you'll get the same Update All Events vs Update Future Events Only choice when you save.

Recalculate trigger dates

Recalculate trigger page with the progress overlay

Recalculating is what you do when a trigger date changes — a hearing gets continued, a complaint gets filed later than planned, a notice gets re-served. Instead of editing every dependent event by hand, you give DocketCalendar the new trigger date and the app regenerates every deadline.

When to recalculate

Recalculate when:

  • The trigger date itself changed.
  • The trigger time or timezone changed in a way that affects deadline math.
  • You picked the wrong service type the first time and the deadlines came out wrong.

Don't recalculate just to fix a label or change an assignee — use Edit a trigger for that.

To recalculate

  1. Open the trigger you want to recalculate.
  2. Click Recalculate.
  3. Enter the corrected trigger date, time, and timezone.
  4. Click Update Calendar.

DocketCalendar regenerates every event tied to this trigger using the new date. A progress bar shows the work happening — don't close the window until it finishes.

If you have a calendar connected, the recalculated events sync to your connected calendar as part of the process. Events that no longer apply are removed; new events are added; existing events are updated in place where possible.

Reviewing the result

Once recalculation finishes, you're taken to a confirmation page showing every event that was generated. From there you can spot-check the new dates, export the list to Excel or iCal, or jump straight back to the case.

Archive a case, trigger, or event

Archived Cases page

Archiving removes something from your active views without losing the data. Archived cases, triggers, and events stay in DocketCalendar — they just stop appearing on the dashboard, the calendar, and in default reports. You can restore them at any time.

Archiving is different from deleting. Deleting is permanent and cannot be undone. Most of the time, you want to archive.

What gets removed from connected calendars

If you have a calendar connected, archiving an event removes it from your connected calendar. Restoring puts it back. Archiving a case archives every event in the case in one operation.

To archive a case

  1. Open the case.
  2. Click Edit Case, then Archive Case.
  3. Confirm. A progress bar shows the events being removed from connected calendars. Wait until it finishes.

To archive a trigger

  1. Open the trigger.
  2. Click Edit Trigger, then Archive Trigger.
  3. Confirm. Every event generated by this trigger is archived along with it.

To archive a single event

  1. Open the event.
  2. Click Archive.
  3. Confirm.

To restore something you archived

  1. In the sidebar, click Archive. This opens the Archived Cases page.
  2. Find the case you want to restore. Click into it to see its archived triggers and events.
  3. Click Restore Case to bring back the whole case, or drill in to restore an individual trigger or event.

Restored items reappear on the dashboard, the calendar, and your connected calendar (if one is connected). All their original details are preserved.

Deleting

If you want to permanently delete something instead of archive it, the Delete option is available in the same place as Archive. Deletion is permanent and cannot be reversed, so DocketCalendar always asks for confirmation first. Use sparingly.

To run reports across your cases and events — including archived ones — see the Reporting chapter.

Reporting

Overview

Reports let you slice your cases and events by date range, case, assignee, jurisdiction, and other filters. Use them to prep for a status meeting, audit your workload, hand off a matter to a colleague, or pull a list of upcoming hearings for the week.

DocketCalendar reports are built around one screen: pick your filters, run the report, view the results in a table, timeline, or summary, and optionally save the configuration to run again later.

Run a report

Create Report page with filters set and results showing

To run a report

  1. Click Create Report in the sidebar.
  2. Set the date range at the top. You can use a preset (Today, This Week, Next 30 Days, etc.) or enter a custom range.
  3. Set the case name if you want to scope the report to a specific case. Leave blank to include all cases.
  4. Choose the scope: Events or Cases. Events gives you a row per event. Cases gives you a row per case with event counts.
  5. (Optional) Click More filters to expand additional options — assignees, jurisdiction, trigger, event type, title, location, calendars, dashboards, categories, and more.
  6. Click Run report.

The results appear below the filters. Run the report again with adjusted filters to refine what you see.

Views

Once a report has run, three view modes are available at the top of the results:

  • Table — a sortable, searchable spreadsheet view. Best for scanning many rows or exporting.
  • Timeline — events grouped chronologically. Best for seeing what's coming up across cases.
  • Summary — KPIs and charts showing event counts, types, and distribution. Best for high-level reporting.

Switch between views without rerunning the report.

Customizing columns

In Table view, click Customize columns to choose which fields appear. Drag columns between the Selected and Available lists to add or remove them. Your column choices are saved for next time.

Save and reuse reports

If you find yourself running the same report regularly — a weekly hearing list, a monthly deadline audit, a workload check by assignee — save its configuration so you can rerun it with one click.

To save a report

  1. Set up the filters you want.
  2. Click Run report to confirm the report works as expected.
  3. Click Save report.
  4. Give the report a name and an optional description.
  5. Click Save.

The report is saved with all its filters, scope, and column choices.

To load a saved report

  1. Click View saved reports at the top of the Create Report page.
  2. Find the report in the list and click Load.

The filters populate with the saved configuration. Click Run report to see the latest data.

To update or delete a saved report

After loading a saved report, you can:

  • Update saved — modify the filters and save the changes back to the same report.
  • Delete — remove the saved report. The underlying cases and events are unaffected.

Export your results

After running a report, you can export the results to share, archive, or work with in another tool.

Export options

From the results toolbar:

  • Excel — download the report as an .xlsx file. Preserves columns and sort order. Best for handing off to colleagues or doing further analysis in a spreadsheet.
  • CSV — download as a plain .csv file. Best for importing into other systems or working with the raw data.
  • Print — open a printable version of the report. Best for hard copies or saving as PDF through your browser's print dialog.

Exports include exactly what's visible in the current Table view — the same rows, columns, and sort order. To change what gets exported, adjust the filters or columns first, rerun the report, and export again.

To go back and adjust the underlying data, see the Editing chapter.

Users

Overview

This chapter covers how to add team members to your DocketCalendar account, control what they can see and do, edit their settings, and manage your firm's subscription.

If you're new to multi-user setup, start with Roles and case access — it explains the permission model that determines how each team member experiences the app. Once that's clear, the rest of the chapter is straightforward.

Some sections of this chapter are only available to firm admins. If a section refers to a feature you don't see in your sidebar, your account is likely set up as a sub-user.

Invite a team member

Create New User page with the form visible

Adding a team member sends them an email invitation. They click the link, sign in with their Microsoft or Google account, and they're set up — no passwords to manage, no manual setup steps.

To invite a team member

  1. Click Users in the sidebar.
  2. Click Create New User.
  3. Fill in their email, first name, and last name.
  4. Enter a calendar name. This is the label that appears on events for this user. Most firms use the person's full name.
  5. Choose a role: Editor, Viewer, or Calendar Only. See Roles and case access if you're not sure which to pick.
  6. Choose a case access level: All cases in the organization or Only cases assigned to them.
  7. Add notes if you want to record anything internal about the user (their title, their team, etc.).
  8. Click Save.

DocketCalendar sends the new user an email with a sign-in link. The invitation is valid for 72 hours. If they don't respond in time, you can resend it from the Users page.

Seat limits

Your subscription includes a set number of user seats. If you've reached your limit, the Create New User button is replaced with an option to upgrade. See Manage your subscription to add more seats.

Edit a team member

Edit User page

Editing a team member updates their settings — name, calendar, role, case access, or notes. Use this when someone changes their name, moves to a different role, or needs different case visibility.

To edit a team member

  1. Click Users in the sidebar.
  2. Find the user you want to edit and click their row.
  3. Update any of the fields shown.
  4. Click Save Changes.

Changing a user's calendar

The Linked Calendar field shows which calendar this user is connected to. To change it, click Change Calendar and pick a different one from the list. If the calendar is having trouble syncing, click Resolve Calendar to fix the connection without disconnecting and reconnecting.

Deactivating a user

If someone leaves the firm or you need to revoke their access:

  1. Open their user record.
  2. Click Deactivate.

Deactivated users can no longer sign in. Their historical events and case associations are preserved. You can reactivate them later if needed, and the seat is freed up on your subscription.

Roles and case access

DocketCalendar's permission model has two independent settings: role and case access. Together they determine what a team member can do and what they can see.

Roles

A user's role controls what they can do in DocketCalendar.

Editor — Full access to create, edit, archive, and delete cases, triggers, and events. Editors can also run reports. This is the default role for most team members.

Viewer — Read-only access. Viewers can see cases, triggers, and events, and they can run reports, but they can't make changes. Use this role for paralegals, associates, or partners who need visibility without edit rights.

Calendar Only — The user doesn't log in to DocketCalendar at all. They simply receive events on their connected Outlook or Google calendar. Use this for people who need to know about deadlines but never need to touch the app — outside counsel, support staff, executive assistants, or attorneys who only work from their calendar.

Case access

A user's case access controls what they can see.

All cases in the organization — The user sees every case in your DocketCalendar account, regardless of who created it or who's assigned to it. Use this for partners, administrators, and anyone who needs firm-wide visibility.

Only cases assigned to them — The user only sees cases where they've been explicitly added as an assignee. Use this for team members who should only see the matters they're working on.

How they combine

The two settings are independent. A Viewer with All cases access can see every case but can't change anything. An Editor with Only cases assigned to them can fully edit the matters they're on but won't see other cases at all.

Calendar Only users don't have a case access setting — they don't log in, so there's nothing to grant access to. They simply receive events on their calendar based on the cases they're added to as attendees.

Update your profile

Profile page for a sub-user

Your profile shows your account information — your name, email, calendar name, and the role and case access your firm admin assigned you.

To view your profile, click Profile in the sidebar.

To change anything on your profile, ask your firm admin. Profile information is managed centrally to keep firm records consistent.

Manage your subscription

The Subscription page is where firm admins handle billing — adding seats, upgrading plans, updating payment information, and downloading invoices.

To open Subscription

  1. Click Subscription in the sidebar.
  2. You'll be taken to the billing portal in a new window.

From there you can add or remove seats, change your plan, update billing details, and review payment history.

The Subscription link is only visible to firm admins. If you don't see it, your account is set up as a sub-user. Sub-users don't need to manage billing — their access is provisioned by their firm's admin.

To customize how DocketCalendar behaves for your whole firm, see the App Defaults chapter.

App Defaults

Overview

App Defaults is where firm admins set the defaults that apply across DocketCalendar — the jurisdiction that's pre-selected on new cases, the reminders that fire before events, the way events look on connected Outlook and Google calendars, and more.

Most settings on this page set themselves once when you onboard. The exceptions are reminders and event display options, which firms commonly adjust as they tune the app to their workflow.

App Defaults is only available to firm admins. To open it, click App Defaults in the sidebar.

This chapter has three task-oriented articles for the most common adjustments, plus a complete reference that explains every field on the page.

Set your default jurisdiction

App Defaults page with Default Jurisdiction highlighted

The default jurisdiction is the jurisdiction that's pre-selected when you create a new case. Setting this saves a few clicks if your firm primarily practices in one jurisdiction.

To set the default jurisdiction

  1. Click App Defaults in the sidebar.
  2. Find the Default Jurisdiction field.
  3. Pick the jurisdiction you want pre-selected on new cases.
  4. Click Save.

This is a default, not a constraint. You can still pick any jurisdiction when creating a specific case — this just changes what's pre-filled.

Configure event reminders

App Defaults page with the reminder fields visible

Reminder settings control when notifications fire before each event. They apply to events DocketCalendar creates from this point forward — existing events keep whatever reminders they were created with.

Settings you can adjust

  • Email reminder — minutes before the event when an email reminder is sent. Default is 30 minutes.
  • Popup reminder — minutes before the event when a popup reminder fires on your connected calendar. Default is 1440 minutes (24 hours).
  • Default appointment length — how long DocketCalendar assumes an event lasts. Default is 60 minutes.
  • Status — whether events show as Busy or Free on your connected calendar. Default is Busy.

To adjust reminders

  1. Click App Defaults in the sidebar.
  2. Update the reminder fields to your preferred values.
  3. Click Save.

To override these defaults on a specific event, edit the event directly. See Edit an event in the Editing chapter.

Customize how events appear on your calendar

App Defaults page with display options visible

If you have a calendar connected (Outlook or Google), these settings control how each event is formatted when it syncs out — what shows up in the event title, what shows up in the body, and how the pieces are separated.

What you can customize

  • Case name location — whether the case name appears in the event title and where.
  • Title field location — where the event's title field appears.
  • Custom text location — where any case- or trigger-level custom text appears.
  • Separators — the punctuation between fields in the title (e.g., a dash, a colon, parentheses).
  • Court rule in body — whether the underlying court rule text appears in the event body.
  • Date rule in body — whether the date calculation rule appears in the event body.
  • Attendees in body — whether the list of attendees appears in the event body.
  • Show trigger — whether the parent trigger's name appears with each event.

In Outlook accounts, you can also set default categories (color labels). In Google accounts, you can set a default event color.

To customize

  1. Click App Defaults in the sidebar.
  2. Adjust the display options to your preference.
  3. Click Save.

Changes apply to events created after you save. Existing events keep their current format unless you edit them.

All settings reference

This is a complete list of every field on the App Defaults page, in the order they appear. Use it to look up what a specific checkbox or dropdown does.

General

  • Default Jurisdiction — Pre-selects this jurisdiction when you create a new case.
  • Default Calendar — Pre-fills this label in the calendar text field on new cases.

Reminders and timing

  • Email reminder — Minutes before the event when an email reminder is sent.
  • Popup reminder — Minutes before the event when a popup reminder fires on your connected calendar.
  • Default appointment length — Default duration assumed for new events, in seconds. (60 minutes = 3600.)
  • Status — Whether events show as Busy or Free on your connected calendar.

How events appear on your connected calendar

  • Case name location — Where the case name appears within the event title.
  • Case name separator — Character used to separate the case name from other fields in the title.
  • Title field location — Where the title field appears within the event title.
  • Title field separator — Character used to separate the title field from other fields.
  • Custom text location — Where any case- or trigger-level custom text appears in the event.
  • Show court rule in body — When on, the underlying court rule text is included in the event body.
  • Show date rule in body — When on, the date calculation rule is included in the event body.
  • Add attendees in body — When on, the list of attendees is included in the event body.
  • Show trigger — When on, the parent trigger's name appears with each event.
  • Event color (Google only) — Default color for events synced to Google Calendar.
  • Categories (Outlook only) — Default category labels for events synced to Outlook.

Recalculation

  • Recalculated events — Default behavior when a trigger is recalculated: update existing event dates only, or rebuild events from scratch.
  • Do-not-recalculate events — Default behavior for events you've manually adjusted: keep your manual change, or overwrite with the new calculated date.

Workflow

  • Assignment settings — Controls whether the Add to Calendars and Add to Dashboards fields appear during case creation.
  • Auto-audit — Enables automatic auditing of events. Leave at the default unless your firm has a specific auditing workflow.

Admin

  • App password restriction — When set to Yes, requires a password to access the Subscription page. Useful for firms that want to limit billing access even among admins.
  • App password — The password used when App password restriction is on.

To set your firm up from scratch — adding team members, configuring roles, and managing your subscription — see the Users chapter.

Additional Tools

Overview

This chapter covers four tools that don't fit neatly into the day-to-day flow but come in handy when you need them: a sync status dashboard for diagnosing calendar issues, an activity log for auditing changes, a research console for looking up court rules without creating a case, and an exclusion manager for filtering out events your firm doesn't want generated.

You don't need any of these to use DocketCalendar effectively. Reach for them when a specific situation calls for them.

Check sync status

Sync Status page with the per-case table visible

When you have a calendar connected, events created in DocketCalendar should appear on your Outlook or Google calendar within seconds. Sync Status is where you go when something doesn't show up — or when you want to confirm a batch of events synced successfully.

What you'll see

  • Summary cards at the top showing total synced, pending, and failed events across your account.
  • Per-case rows with sync counts. Expand a row to see the individual events and their status.
  • Status filter to focus on only synced, pending, or failed events.

To retry failed events

  1. Open Sync Status from the sidebar.
  2. Filter to Failed events.
  3. Select the events you want to retry.
  4. Click Retry.

If retries continue to fail, the calendar connection itself may need attention. See Edit a team member to resolve the calendar, or contact support.

When you won't see this page

Sync Status only appears for users with a connected Outlook or Google calendar. If your firm uses DocketCalendar in web-only mode (no external calendar connection), there's no sync to check on and the page is hidden.

View activity log

Activity Log page with filtered results

The activity log shows a record of changes made in DocketCalendar — cases created, events edited, users invited, and so on. Use it to audit who did what, troubleshoot unexpected changes, or confirm a team member's recent activity.

What you'll see

  • Activity rows showing the user, action, target (the case, event, or trigger affected), and timestamp.
  • Filters for time period (today, this week, this month, custom), action type, and free-text search.
  • Detail modal — click any row to see the technical details of that activity.

Admin vs. sub-user view

  • Firm admins see activity for everyone in the organization.
  • Sub-users see only their own activity.

To filter the log

  1. Open Activity Log from the sidebar.
  2. Pick a time period at the top.
  3. Optionally filter by action type or search for a specific term.
  4. The list updates as you change filters.

Research court rules

Research Console with the three tabs visible

The Research Console lets you look up court rules, holidays, and service types without creating a case. It's useful when you want to know what deadlines would result from a hypothetical filing, check whether a date falls on a court holiday, or confirm which service types are available for a jurisdiction.

What's in the Research Console

Three tabs at the top:

  • Search — search the rule library for triggers, events, and rules. Use this to find what's in the rule set for a given jurisdiction or trigger type.
  • Find Holidays — see court holidays in a jurisdiction for any date range. Use this when you need to know whether a specific date is observed.
  • Get Service Types — look up the available service types for a given case and jurisdiction. Use this before adding a trigger if you're not sure which service type applies.

To research

  1. Open Research Console from the sidebar.
  2. Click the tab for what you want to look up.
  3. Enter the inputs the tab asks for (jurisdiction, date range, etc.).
  4. Click Search (or the equivalent button for that tab).

Results appear inline. Nothing you do in the Research Console creates or modifies a case — it's a lookup tool only.

Manage excluded events

Excluded Events page with the management tab visible

When DocketCalendar generates events from a trigger, it includes everything the rule set defines. Most firms want all of those events. Some firms don't — there may be specific events that your practice never tracks, or that your court interprets differently than the rule library does.

Excluded events let you tell DocketCalendar to skip those events going forward.

What you'll see

  • Excluded Events tab — the list of events currently being excluded for your firm, organized by jurisdiction and trigger.
  • Manage Exclusions tab — where you choose jurisdictions and triggers, preview the events they'd generate, and check off the ones you want excluded.

To add an exclusion

  1. Open Excluded Events from the sidebar.
  2. Click Manage Exclusions.
  3. Choose a jurisdiction and a trigger.
  4. Click Preview to see every event that trigger would generate.
  5. Check the events you want excluded.
  6. Click Save.

From this point forward, when anyone in your firm uses that jurisdiction and trigger combination, the excluded events won't be generated.

To remove an exclusion

  1. Open the Excluded Events tab.
  2. Find the exclusion you want to remove.
  3. Remove it from the list and save.

Exclusions apply to events created after the exclusion is in place. Existing events are unaffected. If you've already created events you don't want, archive or delete them individually.

If you can't find what you need in this guide, click Get Help in the sidebar to reach the DocketCalendar team.

Privacy Policy

Protecting your private information is our priority. This Statement of Privacy applies to www.docketcalendar.com and Docketcalendar.com, LLC and governs data collection and usage. For the purposes of this Privacy Policy, unless otherwise noted, all references to Docketcalendar.com, LLC include www.Docketcalendar.com, tools.docketcalendar.com, CalendarRules.com, DocketLaw.com and www.docketlaw.com. The DocketCalendar website is a Legal Calendaring\Court Rules site. By using the DocketCalendar website, you consent to the data practices described in this statement.

DocketCalendar Google User Data Policy

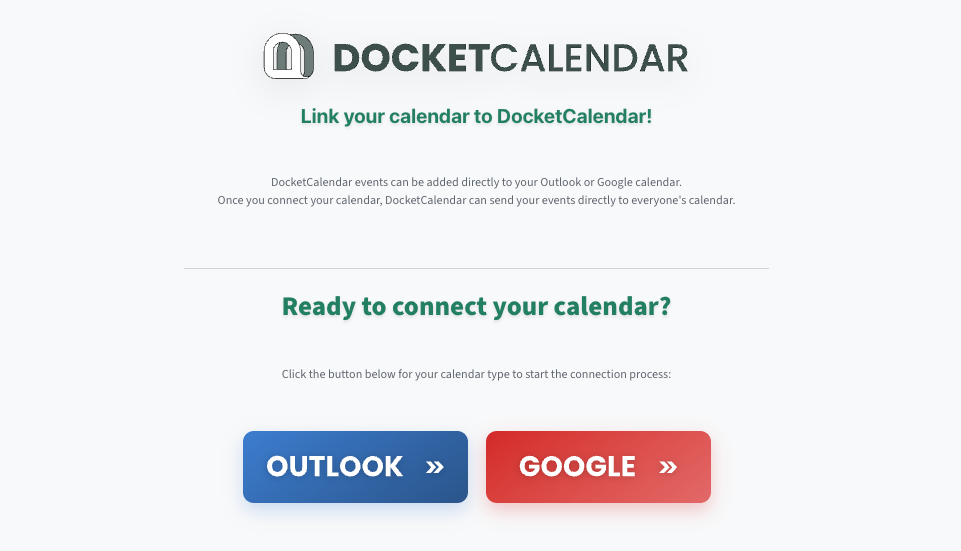
DocketCalendar automates the calculation of litigation and court related deadlines and generates events on your Google Calendar using the Google Calendar API.

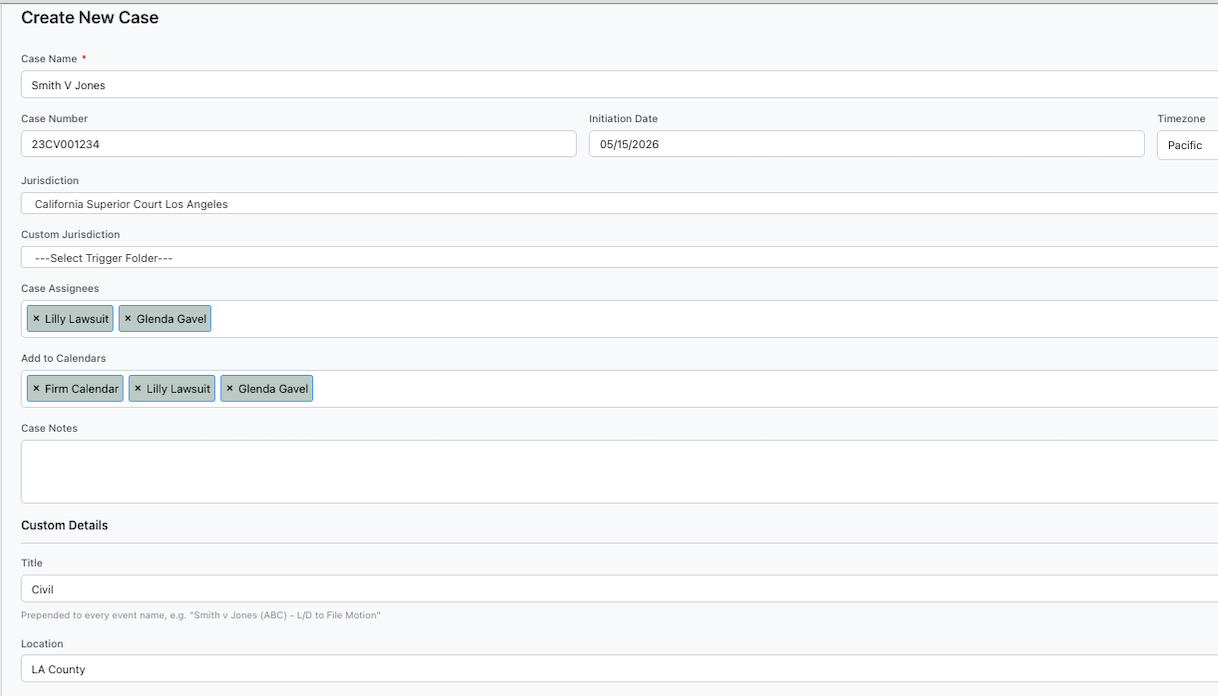
Contacts: DocketCalendar can access your Google contacts in read only mode to allow users to select Google contacts for the purpose of sending invitations to the event deadlines created by our App. Events created by DocketCalendar can then be sent to another Google user’s Google Calendar as invitations to events on the user’s Primary Calendar.

We do not store your Google Contacts or access your Google Contacts for any purpose other than to allow you to select contacts to add or edit events created by DocketCalendar. Contacts added to events created by DocketCalendar are stored in our secure online database. These records can only be accessed by you through the DocketCalendar website with your unique DocketCalendar Login and Password. They are not retained by DocketCalendar for any purpose other than your specific use as an attendee to events created by you with our App.

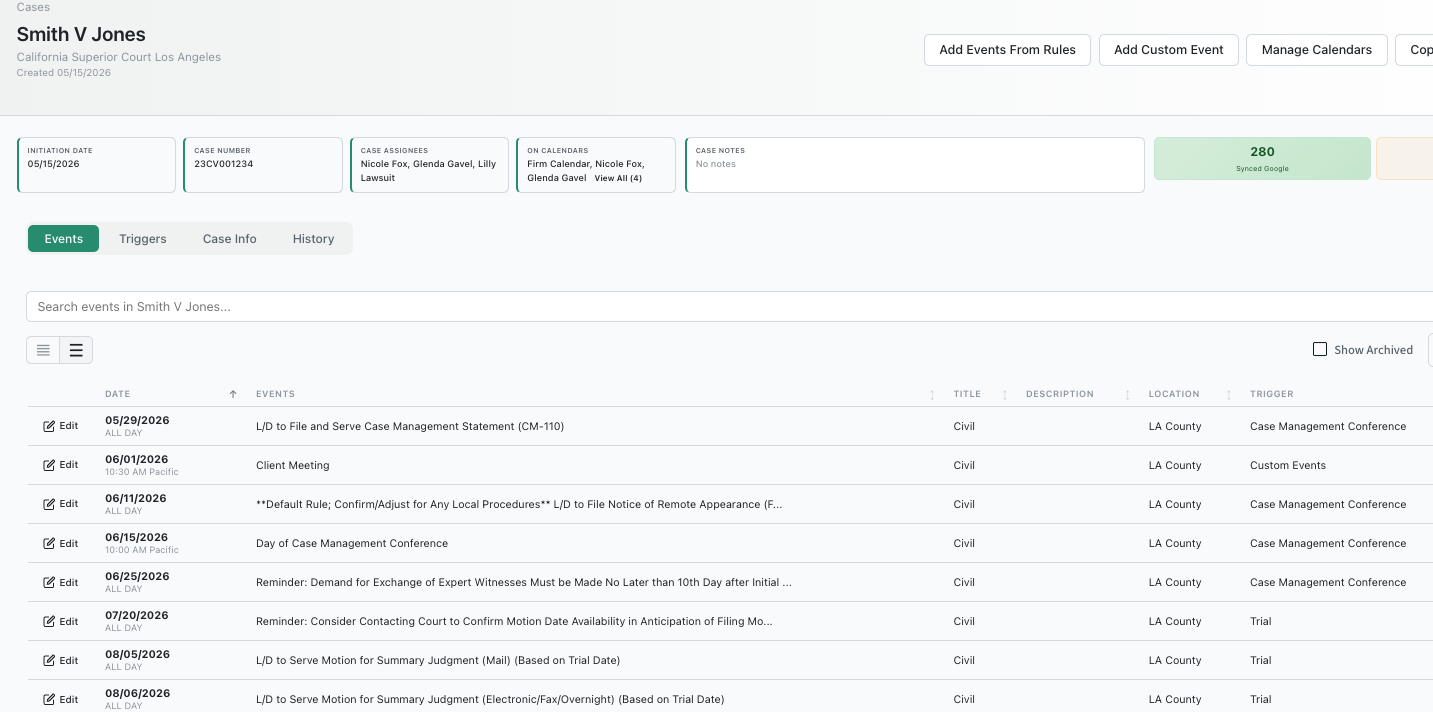
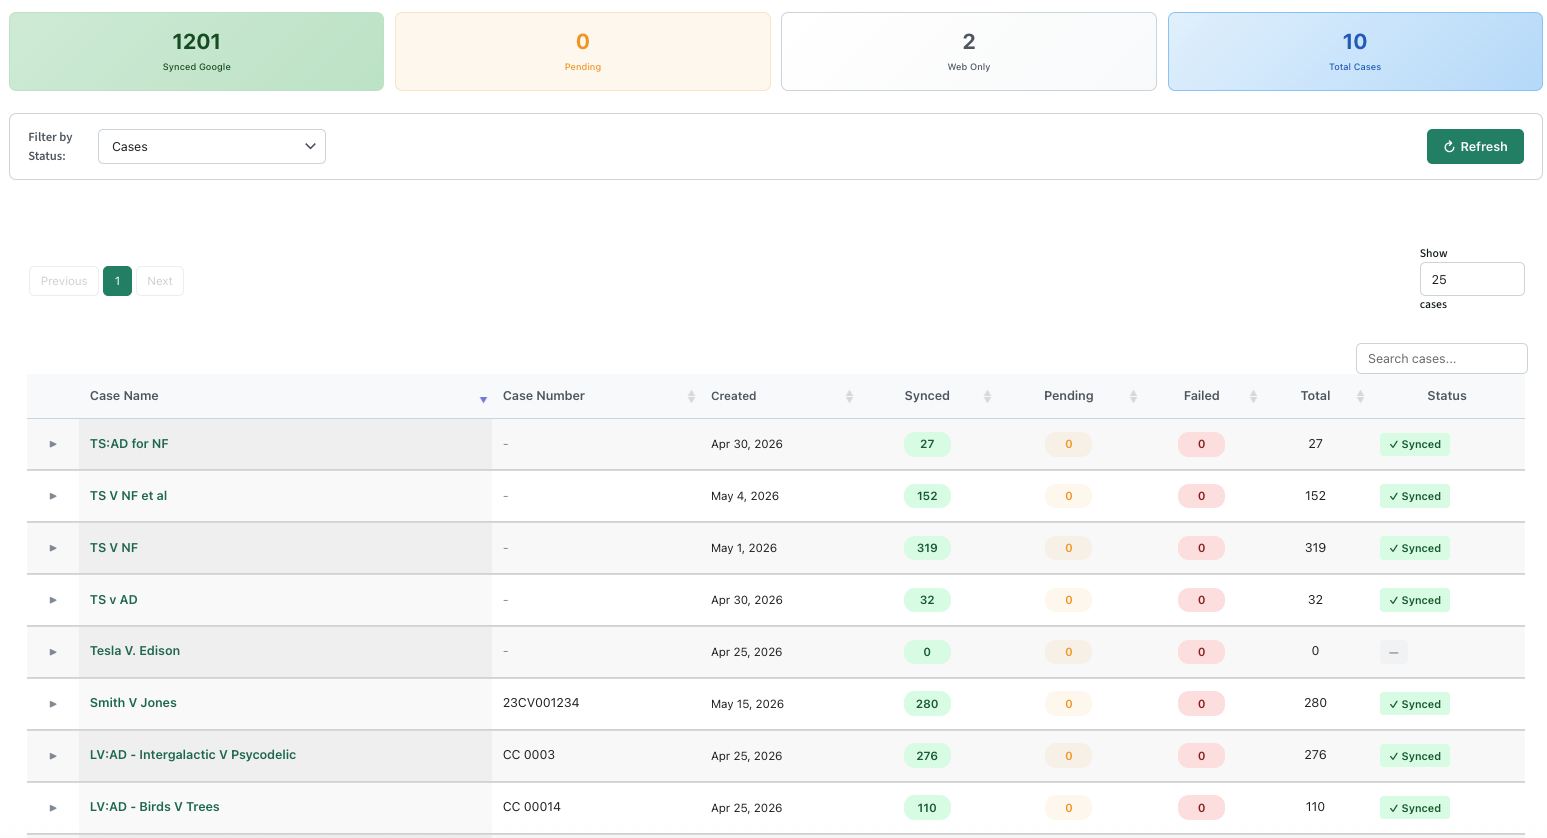
Calendars: DocketCalendar can access your Primary Google Calendar, any Secondary or Additional Calendars you create and any Primary or Secondary Calendars that have been shared to you by another Google user, provided they have allowed you full edit privileges to that Calendar.

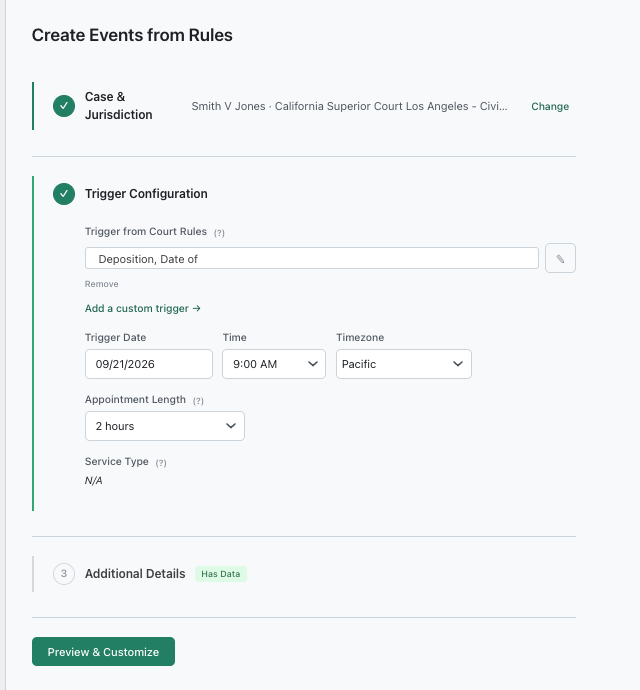
Access to your Calendars allows DocketCalendar to create events that match event records stored in your DocketCalendar App profile. DocketCalendar can add events to your Calendar, and once it has added an event, you can edit and delete that event with DocketCalendar. DocketCalendar cannot access, edit or delete any other events not specifically created by our App.

Collection of your Personal Information In order to better provide you with products and services offered on our Site, DocketCalendar may collect personally identifiable information, such as your: - First and Last Name - Mailing Address - E-mail Address - Phone Number.

If you purchase DocketCalendar's products and services, we collect billing and credit card information. This information is used to complete the purchase transaction. We do not collect any personal information about you unless you voluntarily provide it to us. However, you may be required to provide certain personal information to us when you elect to use certain products or services available on the Site. These may include: (a) registering for an account on our Site; (b) entering a sweepstakes or contest sponsored by us or one of our partners; (c) signing up for special offers from selected third parties; (d) sending us an email message; (e) submitting your credit card or other payment information when ordering and purchasing products and services on our Site. To wit, we will use your information for, but not limited to, communicating with you in relation to services and/or products you have requested from us. We also may gather additional personal or non-personal information in the future.

Use of your Personal Information DocketCalendar collects and uses your personal information to operate its website(s) and deliver the services you have requested.

DocketCalendar may also use your personally identifiable information to inform you of other products or services available from DocketCalendar and its affiliates.

Sharing Information with Third Parties DocketCalendar does not sell, rent or lease its customer lists to third parties.

DocketCalendar may share data with trusted partners to help perform statistical analysis, send you email or postal mail, provide customer support, or arrange for deliveries. All such third parties are prohibited from using your personal information except to provide these services to DocketCalendar, and they are required to maintain the confidentiality of your information. DocketCalendar may disclose your personal information, without notice, if required to do so by law or in the good faith belief that such action is necessary to: (a) conform to the edicts of the law or comply with legal process served on DocketCalendar or the site; (b) protect and defend the rights or property of DocketCalendar; and/or (c) act under exigent circumstances to protect the personal safety of users of DocketCalendar, or the public.

Tracking User Behavior DocketCalendar may keep track of the websites and pages our users visit within DocketCalendar, in order to determine what DocketCalendar services are the most popular. This data is used to deliver customized content and advertising within DocketCalendar to customers whose behavior indicates that they are interested in a particular subject area.

Automatically Collected Information Information about your computer hardware and software may be automatically collected by DocketCalendar. This information can include: your IP address, browser type, domain names, access times and referring website addresses. This information is used for the operation of the service, to maintain quality of the service, and to provide general statistics regarding use of the DocketCalendar website.

Use of Cookies The DocketCalendar website may use "cookies" to help you personalize your online experience. A cookie is a text file that is placed on your hard disk by a web page server. Cookies cannot be used to run programs or deliver viruses to your computer. Cookies are uniquely assigned to you, and can only be read by a web server in the domain that issued the cookie to you. One of the primary purposes of cookies is to provide a convenience feature to save you time. The purpose of a cookie is to tell the Web server that you have returned to a specific page. For example, if you personalize DocketCalendar pages, or register with DocketCalendar site or services, a cookie helps DocketCalendar to recall your specific information on subsequent visits. This simplifies the process of recording your personal information, such as billing addresses, shipping addresses, and so on. When you return to the same DocketCalendar website, the information you previously provided can be retrieved, so you can easily use the DocketCalendar features that you customized. You have the ability to accept or decline cookies. Most Web browsers automatically accept cookies, but you can usually modify your browser setting to decline cookies if you prefer. If you choose to decline cookies, you may not be able to fully experience the interactive features of the DocketCalendar services or websites you visit.

You have the ability to accept or decline cookies. Most Web browsers automatically accept cookies, but you can usually modify your browser setting to decline cookies if you prefer. If you choose to decline cookies, you may not be able to fully experience the interactive features of the CalendarRules services or websites you visit.

Security of your Personal Information

DocketCalendar secures your personal information from unauthorized access, use, or disclosure. DocketCalendar uses the following methods for this purpose: - SSL Protocol

When personal information (such as a credit card number) is transmitted to other websites, it is protected through the use of encryption, such as the Secure Sockets Layer (SSL) protocol. We strive to take appropriate security measures to protect against unauthorized access to or alteration of your personal information. Unfortunately, no data transmission over the Internet or any wireless network can be guaranteed to be 100% secure. As a result, while we strive to protect your personal information, you acknowledge that: (a) there are security and privacy limitations inherent to the Internet which are beyond our control; and (b) security, integrity, and privacy of any and all information and data exchanged between you and us through this Site cannot be guaranteed.

Children Under Thirteen DocketCalendar does not knowingly collect personally identifiable information from children under the age of thirteen. If you are under the age of thirteen, you must ask your parent or guardian for permission to use this website.

E-mail Communications From time to time, DocketCalendar may contact you via email for the purpose of providing announcements, promotional offers, alerts, confirmations, surveys, and/or other general communication. In order to improve our Services, we may receive a notification when you open an email from DocketCalendar or click on a link therein. If you would like to stop receiving marketing or promotional communications via email from DocketCalendar, you may opt out of such communications by replying STOP.

External Data Storage Sites We may store your data on servers provided by third party hosting vendors with whom we have contracted.

Changes to this Statement DocketCalendar reserves the right to change this Privacy Policy from time to time. We will notify you about significant changes in the way we treat personal information by sending a notice to the primary email address specified in your account, by placing a prominent notice on our site, and/or by updating any privacy information on this page. Your continued use of the Site and/or Services available through this Site after such modifications will constitute your: (a) acknowledgment of the modified Privacy Policy; and (b) agreement to abide and be bound by that Policy.

Contact Information DocketCalendar welcomes your questions or comments regarding this Statement of Privacy. If you believe that DocketCalendar has not adhered to this Statement, please contact DocketCalendar at: Docketcalendar.com, LLC 3000F Danville Blvd. #276 Alamo, California 94507 CalendarRules.com, LLC 3000F Danville Blvd. #276 Alamo, California 94507

Email Address: support@docketcalendar.com

Telephone number: 925-240-3007

Effective as of February 06, 2018